When planning a more formal event, you’ll want to set the scene by setting the table. That means paper plates and plastic knives won’t cut it. However, not all of us are a butler named Carson and work at Downton Abbey.
Here is a breakdown of what to do that will not only set the table but set you at ease. You’ve got this!
Step One: Linens
The first decision you’ll need to make is whether you want a tablecloth, table runner, placemats, chargers, or go au naturale. If you are having trouble deciding, we suggest reviewing your other décor elements because you’re going to want things to flow and fit together nicely. If you still can’t decide, Pinterest is always full of inspiration. After all, imitation is the best form of flattery.
P.S. Don’t forget napkins! More on that later.
Step Two: Plates and Cutlery
Once you’ve decided how you want to dress your table, you can begin building up your tableware elements. Below is a diagram from Good Housekeeping with a good reference guide.
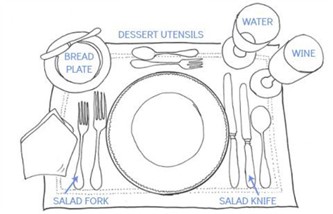
Let’s break it down.
Plates: You’re going to want to start with your dinner plate (the biggest one). Think of it as your North Star that will guide you through the entire process. Feel free to build up your plates from here, working from biggest to smallest.
Note: the bread plate won’t be part of your plate pyramid. Instead, it will be set off to the side. The top left above the forks to be exact.
Utensils: A good rule of thumb for utensil placement is to put them in order of use. Forks go on the left starting with the salad fork, fish fork, and dinner fork. Of course, forgo the fish fork if it isn’t on the menu.
You may be wondering about the dessert fork, but don’t be fooled! It doesn’t belong on the left, but up top with the fork tines pointing right. Since people are grabbing their fork with their left hand, you want the handle to be pointing left for easy access.
As for knives, they go on the right, and just like the forks, they are placed in order of use. Be sure to have the blade of the knife facing the plate.
Beside the knives, on the outside, is where your soup spoon will go. Like the fish fork, if soup isn’t on the menu, feel free to scrap this utensil. For your dessert spoon, which will also be used for stirring coffee or tea, it will be placed above the dessert fork. However, the handle will be pointing right.
Step Three: Glasses
Glasses: Are your guests feeling thirsty? They can find their glasses on the right, just above their knives and spoons. Place your water glasses down first, with other glasses to follow (e.g., wine, champagne, etc.). Absent from the diagram above is your cup and saucer, which you can place above your dessert utensils. Since most people are right-handed, be sure to have the handle point right.
Step Four: Oh, goodness – the napkin!
Many guides will have you place your napkin under the forks. While that is correct, it can turn into a utensil fumble as guests try to delicately slide the napkin from underneath. Not all of us can be master magicians.
Instead, try incorporating a unique fold that you can place on the centre of your plate. There are so many unique ways you can use napkins as part of your décor that it almost seems a waste to place it under the forks.
And voila! You’re done.
So, whether it’s a gala, company party, fundraiser, or a team-building session, set the scene by setting the table. While we aren’t party planners, Festival is happy to provide you with all the supplies you need to create the event of the season!